
Ulmer Quick Guide: Resume Tips
This guide is designed to provide you with useful tips and tricks for crafting a professional, reverse-chronological resume that can be used across a variety of business-oriented industries.
PART I: Resume Formatting
Learn about the nuts & bolts of setting up your resume’s structure, including margins, font, spacing, etc. Here’s a step-by-step process to set up the structure for your resume so that it’s easier for you to fill in the content where and how you want it. Note we are using Microsoft Word, version 16. Previous versions may look different depending on the version you are using.
STEP 1: Resume Spacing
For Mac: Click the down arrow on the icon and select “Line Spacing Options.”
For PC: Click the drop-down arrow next to the “Paragraph” menu or right-click on the document and click “Paragraph.”
Set Left, Right, Before, After spacing to 0”. Set “Special” Indentation to None. Set “line spacing” to single. Check the box for “Don’t add space between paragraphs of the same style.”
STEP 2: Resume Margins
For Mac & PC: Click the “Layout” menu at the top of your screen and then the “Margins” icon.
You may select either the “Normal” 1” margins or the “Narrow” 0.5” margins. This setting may depend on how much content you plan to include in your resume.
STEP 3: Resume Font
Select a black font color, as well as your preferred font style and size.

- Opt for font styles like: Calibri, Garamond, Helvetica, Arial, or sans serif fonts
- We recommend NOT using the default Times New Roman or other serif fonts because fonts such as Arial, Arial Narrow, Calibri, and Verdana are easier to read in a quick glance at your resume
- Use either 10, 11, or 12 point font sizes for resume content; larger font size may be used for resume section headings and your name
STEP 4: Resume Sections
There are several sections that form the structure of your resume. Some sections are always required, while others may vary according to your personal experience or what you wish to include, vis-à-vis the requirements of the job or internship position for which you are applying.
Here are example sections for a resume:
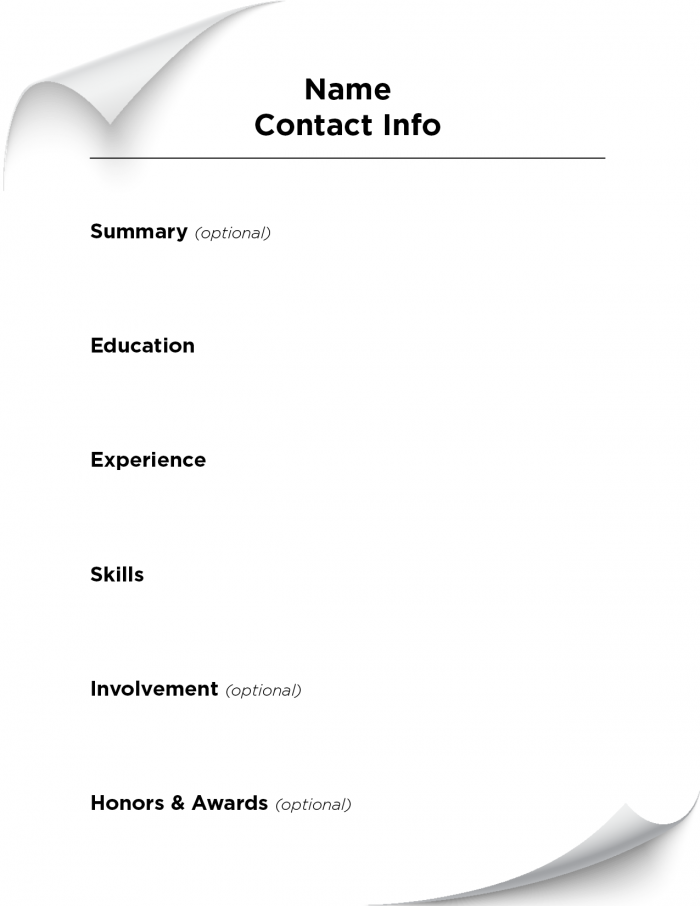
Now you are set up to start adding the content to each of your sections! Pay attention, however, to these do’s and don’ts when crafting your resume.
- Do not exceed 1-page, unless you have at least 5-6+ years of professional experience.
- Do not use any symbols, clip art, photos, charts, or text boxes.
- Instead, use characters like: { [ | ] } –
- Do not include references on your resume
- Make sure your style, font, and spacing are consistent throughout the document for a more professional look.
- Do not include color, unless you plan to use if for your name and section headings.
PART II: Resume Content Creation
Below are explanations for what content should be included within each section of your resume. In general, you want to include truthful information that demonstrates or describes skills, knowledge, experience, strengths that you believe are relevant to the job or internship for which you are applying. Click here to view a sample resume.
Use Microsoft Word to create your resume from scratch; DO NOT use pre-existing resume templates. The unique look you’re hoping to achieve by using a template is lost on recruiters who see hundreds of resumes each week. In addition, it’s hard to change formatting templates if you want to highlight information through strategic placement on your resume. Finally, templates may employ text boxes, and the resume software used by recruiters doesn’t read information in text boxes.
SECTION 1: Name & Contact Info
Your name and contact info should be placed at the top of your resume. Your name should be in a font size larger than the rest of your resume content so that it stands out. You should minimally include a telephone number and email address that you check often.

- Make sure your email address is professional.
- You do not always have to include your full address. Instead, you can list your city and state.
- You have the option to list your LinkedIn profile link here, especially if you have more information that you wish to share that cannot fit on your 1-page resume.
- If you include your LinkedIn profile, we encourage you to customize your URL.
SECTION 2: Summary or Professional Profile
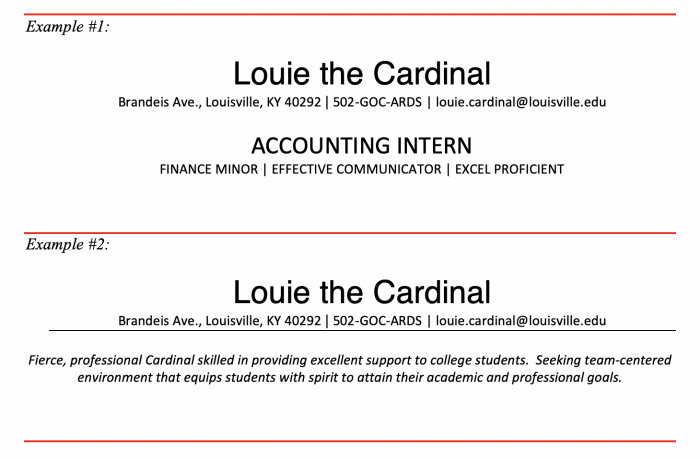
If you want to highlight certain things about yourself and what you bring to employers, you can place that information in the summary. It is optional but can be really powerful if tailored to the position you want and using keywords you find in the posting description for that position.
Types of Summaries:
- Keyword(s)—you could list the position you’re looking for, like “Accounting Intern.” Or maybe you wish to list some of your attributes like “Marketing Student | Digital Marketing | French Proficiency”
- Summary Statement—you may even write a brief 1-2 sentences about who you are, 1-2 of your skills, and what you’re looking for, like:
“Marketing student experienced in social media content development. Seeking to utilize strategic and collaborative mindset to contribute as a marketing intern.”
SECTION 3: Education
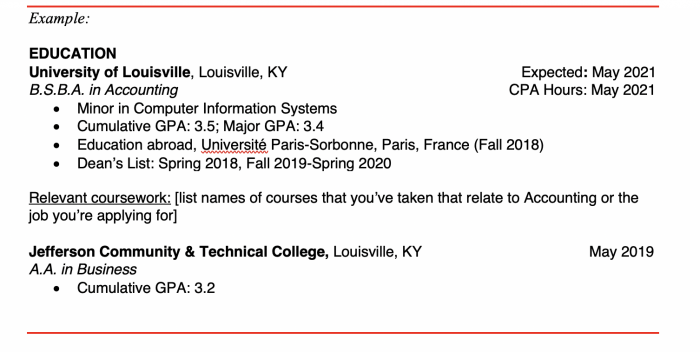
This section is to describe your college-level educational experience. You do NOT need to put any high school academics in this section. List the college where you’re attending and pursuing a degree (& have attended and earned a degree). In this section, you will list items like the following:
- Name of college(s)
- City and state where the college(s) is located
- Month and year of graduation (or expected graduation)
- If you are an Accounting major, you need to list the Month & Year that you’re going to complete your 150 credit hours for the CPA exam.
- Your degree’s name (i.e., BSBA, MBA, etc.)
- Your major
- Any minors or major concentrations you have
- Your cumulative GPA (if 3.0 or above); Major GPA for Accounting majors
- Any accolades, like Dean’s List, Scholarships
- Study abroad
- Relevant coursework (optional)
SECTION 4: Experience
This section is where you describe your relevant experience via jobs you’ve held or internships you’ve completed. It may also be through volunteer experiences you’ve participated in if you have not had a job or internship. If you are a UofL athlete, you can put your UofL athletic experience here also.
When listing your experience, include the following:
- Name of the company/organization where you did your experience
- City & State where you did your experience
- Dates during which you did your experience
- “Month Year-Present” or “Month Year-Month Year”
- Your position/job title or role
- A general description of what you do in your job or role
- Bullets that describe “wow” factors, like those below, if you have them
- Projects you’ve worked on or instances you took a leadership role
- Awards or recognition you’ve received; promotions
- Particular parts of your job/role you wish to highlight
Be clear, concise, and specific! You need to demonstrate how or what you do or did. For example, if you want to say you assisted in creating a plan for something, what specifically did YOU do in helping to create that plan? How did you do it?
- If talking about a role that you are still doing, use the present tense, and use past tense when talking about a past job/role
- If incorporating numbers into your job/role entry, list the actual numbers (i.e., 4 not four)
- Start each line with active verbs that communicate how or what you do/did
- Don’t overuse the same active verbs for your experience descriptions/bullets
Think about the S-T-A-R method to help you think about how you might write your description and “wow” bullets.
- S – Situation – what was the situation?
- T – Task – what were you tasked with doing?
- A – Action(s) – what actions did you take to complete the task?
- R – Result(s) – what were the results of your actions?
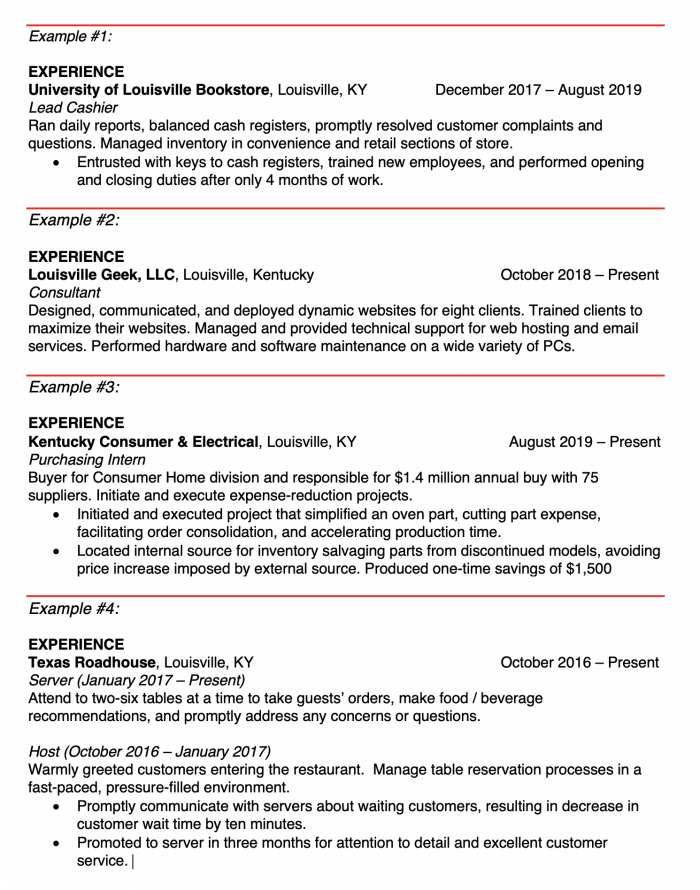
See below for examples for ways you can put together your Experience section.
SECTION 5: Skills
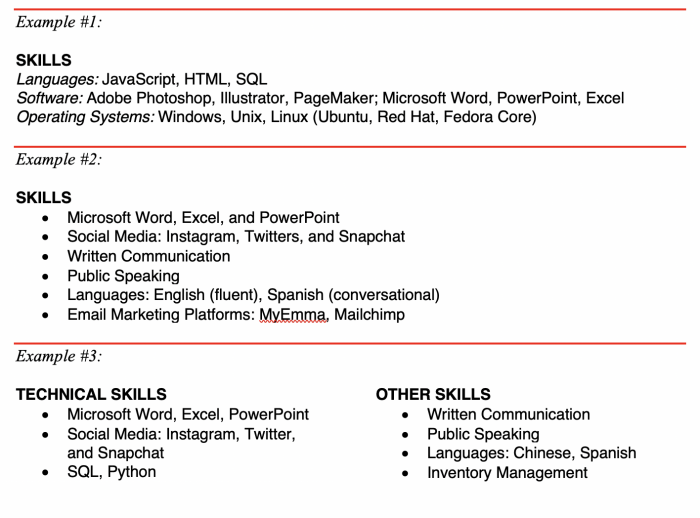
This section is where you describe skills that you possess that are relevant to the position for which you are applying. Focus on more technical skills that you have that are easy to understand.
Skills more ambiguous, like “leadership,” “dedication,” “organization” or “punctuality” are not good to put here. Rather, these types of skills should be demonstrated and described in your Experience section.
If you have a major that requires a lot of technical skills (i.e., CIS), then you will want to put your Skills section before your Experience section to highlight that information.
Skills to include in this section:
- Microsoft Word, Excel, PowerPoint, Access, Vizio, etc.
- Adobe Photoshop, Illustrator, and suite applications.
- Coding languages (e.g., HTML, C#, SQL, Java, R, etc.)
- Operating systems (e.g., Linux, Windows, etc.)
- Web development & related platforms (e.g., Drupal, WordPress, etc.)
- Social media (e.g., Facebook, Instagram, Twitter, Snapchat, etc.)
- Oral and written communication
- Foreign languages
- Research tools (e.g., SPSS, other statistical software)
- Any technologies you use in your job/roles (e.g., Quick Books, Kronos time management, etc.)
- Certifications you may have
See below for examples for ways you can put together your Skills section.
ADDITIONAL, OPTIONAL SECTIONS
These sections are not essential if you do not have any content to put into them. However, perhaps you have some experience or content that you wish to highlight but have not yet done so in your resume. You may be able to incorporate them into the following sections.
INVOLVEMENT
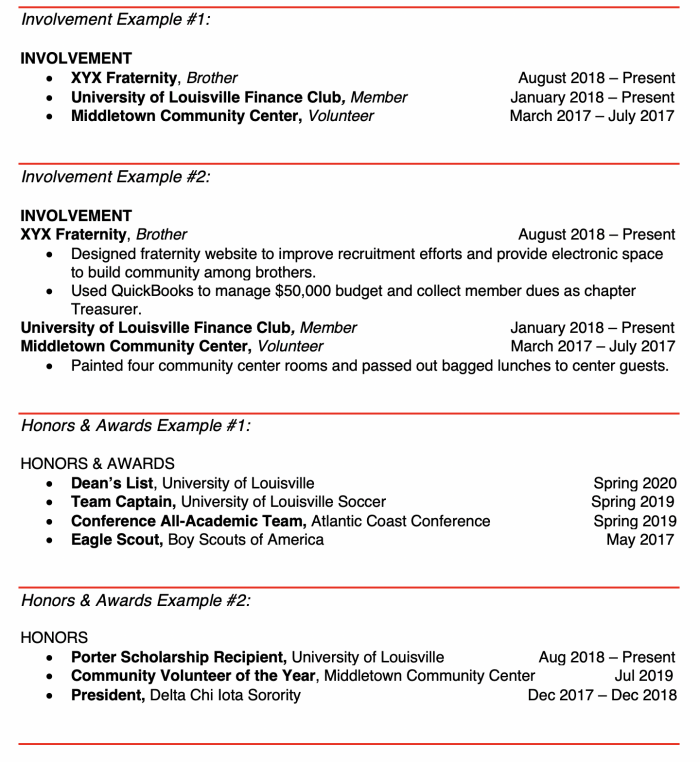
This section is where you talk about the ways in which you are involved, such as volunteer experiences, as well as campus or civic organizations of which you held a membership. Depending on the position for which you are applying, and what you wish to share about your involvement, you can simply list the experience, or you can provide some detail. Make sure your entries are in reverse-chronological order, starting with the most recent.
Make sure, however, you include the following items:
- Organization/Volunteer Company Name
- Dates of your involvement
- Your involvement (i.e. participant? Leadership position?)
HONORS & AWARDS
If you have received several awards and accolades, you may wish to have your own section where you highlight them. Make sure to include the name of the award, organization who awarded it to you, and the date you received it. Entries in this section also need to be placed into reverse chronological order, with most recent coming first.
LEADERSHIP
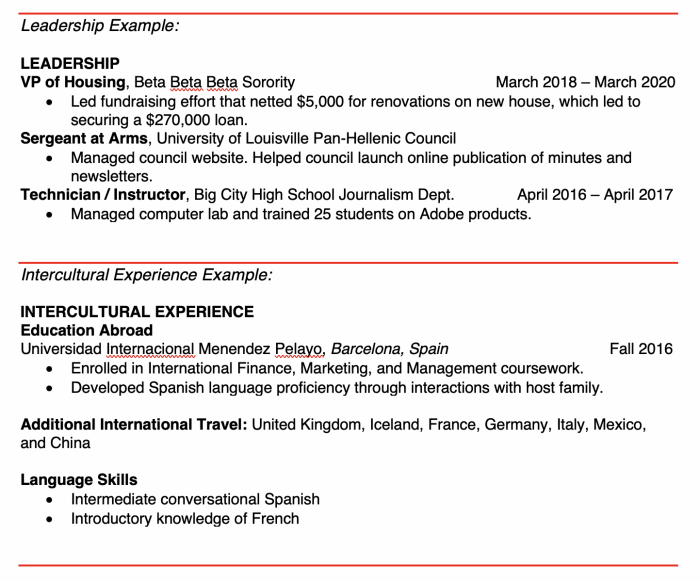
If you have held a lot of leadership positions, you may wish to highlight that in a separate section, including what you did in that leadership role. Make sure to include the name of the position, the organization/entity where you held the position, and the dates you held the position.
INTERNATIONAL OR INTERCULTURAL EXPERIENCE
If you have traveled a lot and interacted with a variety of people, know more than one language, have studied abroad, etc., and you wish to highlight this aspect of your experience, you could incorporate all of this information into one section.
See below for examples of each section.
Resumes are individual. They should reflect who you are and the story you wish to tell about yourself vis-à-vis the job/internship for which you are applying. The examples and advice provided within this quick start guide by no means represent the only way to write a resume. Depending on your experience, what you’re applying to, and what you wish to convey in your resume, you may need to utilize a different strategy or resume structure. The Ulmer Career Center is here to help you construct your resume or answer any questions you may have.
Have additional questions or wish to have your resume reviewed by a Career Coach?
Contact a Career Coach Make an appointment via Cardinal Careers